A frameless glass shower enclosure with 3/8-inch or 1/2-inch tempered glass is the most popular upgrade California homeowners are choosing for bathroom remodels right now, and for good reason — it opens up the bathroom visually, is easier to clean than framed alternatives, and adds measurable resale value to the home. According to the National Association of Home Builders, bathroom remodels consistently rank among the top three home improvements for return on investment, and the shower enclosure is the single most visible element in any bathroom renovation.
John, owner of Colfax Glass at 226 N Auburn St in Colfax, has been installing shower glass enclosures across the Sierra Foothills and Northern California coast for over 25 years. The questions he hears most often are the same ones you probably have: should I go frameless or framed, how thick does the glass need to be, what will it cost, and how long will the installation take.
This guide covers every decision point in the shower enclosure process: the three main frame styles and when each one makes sense, glass thickness options and what actually matters for safety and durability, hardware and finish choices, accurate cost ranges based on real California projects, and what to expect during installation. Whether you are replacing an old shower curtain rod with your first glass enclosure or upgrading a dated framed unit to frameless, the information here will help you make a confident decision before spending a dollar.
The U.S. Consumer Product Safety Commission's 16 CFR Part 1201 requires all glass in hazardous locations — including shower and tub enclosures — to pass impact safety testing. California Building Code Chapter 24 further requires all such glass to be safety glazed, meaning tempered or laminated. Standard annealed glass is not legal in wet areas. Every shower glass panel Colfax Glass installs carries a permanent tempered glass stamp verifying compliance.
Frameless, Semi-Frameless, or Framed: What Is the Difference?
The three main styles of shower enclosures differ in how much metal framing surrounds and supports the glass panels. The choice between them affects the look, cost, cleaning effort, and installation requirements of the finished enclosure.
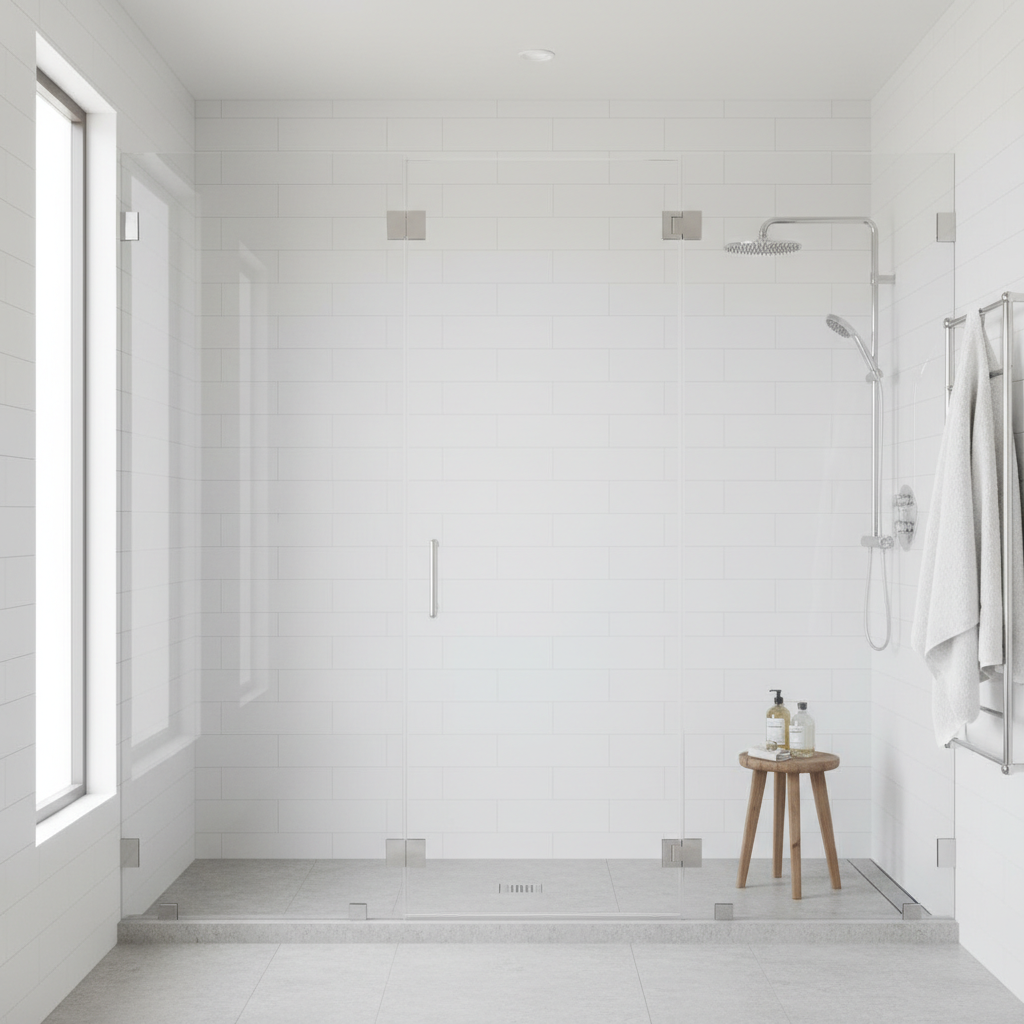
Frameless enclosures use thicker glass panels (typically 3/8-inch or 1/2-inch) that are heavy and rigid enough to stand on their own without a metal frame around the perimeter. The glass is held in place by minimal hardware — usually hinges mounted directly to the wall or a fixed panel, and small clips or channels at the base. The result is a clean, open look with maximum visibility and almost no metal to collect soap scum or water deposits. Frameless is the premium option and the most popular choice for modern bathroom remodels.
Semi-frameless enclosures use a thin metal channel along the top and bottom of the glass and sometimes along the sides, but leave the door panel itself without a full frame. This is a middle-ground option that provides some of the visual openness of frameless while adding structural support that allows the use of thinner glass. Semi-frameless enclosures work well for openings that are not perfectly plumb or square, because the channel can accommodate minor variations in wall alignment.
Framed enclosures have a full metal frame around every glass panel and the door. The glass sits inside the frame channels and is typically thinner (usually 1/4-inch) because the frame provides the structural support. Framed enclosures are the most affordable option, the most forgiving of out-of-square walls, and the easiest to install. The tradeoff is a heavier visual profile and more metal surfaces to keep clean.
If your bathroom walls are significantly out of plumb or your tile work has irregularities at the shower opening, frameless may require additional shimming or custom cutting to achieve clean contact. John assesses wall conditions during every measurement visit and will recommend the style that works best for your specific opening.
| Feature | Frameless | Semi-Frameless | Framed |
|---|---|---|---|
| Glass thickness | 3/8" to 1/2" | 5/16" to 3/8" | 1/4" (typical) |
| Visual openness | Maximum — minimal hardware visible | Moderate — thin channels visible | Lower — full metal frame surrounds glass |
| Cleaning ease | Easiest — fewer surfaces to trap buildup | Moderate | Most maintenance — frame channels collect deposits |
| Wall requirements | Walls must be plumb and true | Tolerates minor wall variations | Most forgiving of out-of-square conditions |
| Typical cost range | $1,200 – $3,500+ installed | $800 – $2,000 installed | $400 – $1,200 installed |
| Installation complexity | Highest — precision measurement required | Moderate | Lowest — standard sizing available |
Shower Glass Thickness: Does It Actually Matter?
Glass thickness affects weight, rigidity, feel, and cost. For shower enclosures, you will encounter three common thicknesses: 1/4-inch, 3/8-inch, and 1/2-inch. All shower glass in California must be tempered regardless of thickness — a requirement defined by ANSI Z97.1, the national safety glazing standard — so safety is not the differentiator. The practical differences are in how the enclosure looks, feels, and performs over time.
One-quarter-inch tempered glass is the standard for framed enclosures. The metal frame provides the structural rigidity, so the glass itself does not need to be as thick. At this thickness, the glass weighs roughly 3.3 pounds per square foot. It is perfectly adequate inside a full frame and keeps the enclosure cost down.
Three-eighths-inch tempered glass is the most common choice for frameless and semi-frameless enclosures. It weighs roughly 5 pounds per square foot and has enough rigidity to stand unsupported with proper hardware. This thickness provides a solid feel when you open and close the door and resists flexing under normal use. Most frameless installations Colfax Glass completes use 3/8-inch glass.
One-half-inch tempered glass is the premium option for frameless enclosures. It weighs roughly 6.5 pounds per square foot and has a noticeably more substantial look and feel than 3/8-inch. The thicker edge profile catches light differently and creates a more refined appearance. The performance difference between 3/8-inch and 1/2-inch is primarily aesthetic and tactile — both are more than strong enough for residential shower use. The cost premium for 1/2-inch over 3/8-inch is typically $150 to $400 for a standard enclosure, depending on the size and number of panels.
John's recommendation for most foothill homeowners: 3/8-inch tempered glass for frameless enclosures gives you the clean frameless look and solid feel at a reasonable cost. Upgrade to 1/2-inch if your budget allows and you want the premium edge profile, but 3/8-inch is not a compromise — it is the industry standard for quality frameless installations.
Enclosure Configurations: Sliding, Pivot, Hinged, and Walk-In
The shape and layout of your shower opening determines which enclosure configurations are available. Matching the right configuration to your bathroom layout affects both daily usability and the total project cost.
Single hinged door with a fixed panel is the most common frameless configuration. A fixed glass panel is mounted to the wall, and a door panel swings open on hinges attached to the fixed panel. This works for standard alcove showers and tub-to-shower conversions where the opening is along one wall. The door can swing inward, outward, or both directions depending on the hardware.
Sliding bypass doors use two panels that slide past each other on a track. This is the traditional tub-shower configuration — two glass panels ride in a top and bottom track, and you slide one behind the other to enter. Sliding doors are practical where there is not room for a swinging door and are available in framed and semi-frameless styles. Fully frameless sliding systems exist but are significantly more expensive due to the precision track hardware required.
Pivot doors rotate on a pivot hinge at the top and bottom rather than side-mounted hinges. The door swings through the plane of the opening, which means it extends slightly into the shower and slightly into the bathroom when open. Pivot hardware allows wider door panels without the weight stress that side hinges create, making this a good choice for larger openings.
Neo-angle enclosures fit into a corner with an angled front that creates a diamond-shaped shower footprint. These are common in smaller bathrooms where a rectangular enclosure would take too much floor space. The angled panels require precise measurement and custom cutting.
Walk-in or doorless enclosures use one or more fixed glass panels to define the shower space without a door at all. The opening faces away from the bathroom or is wide enough that water does not escape. Walk-in configurations require a larger shower footprint — typically at least 36 inches of open entry width — and a well-positioned shower head to keep water from reaching the bathroom floor.
- Single hinged door + fixed panel: Most popular frameless option, works for standard alcove showers, requires clearance for the swing
- Sliding bypass: Best for tub-showers and tight bathrooms, available in all frame styles, keeps water contained well
- Pivot door: Good for wider openings, distributes door weight evenly, extends slightly into both shower and bathroom when open
- Neo-angle: Corner-mounted, space-efficient, requires custom glass cutting, common in smaller bathrooms
- Walk-in / doorless: Premium option with no door to clean or operate, requires larger shower footprint and careful water management
Hardware and Finishes: What Holds Your Enclosure Together
Shower enclosure hardware includes hinges, clamps, handles, towel bars, header bars, and mounting channels. The hardware does structural work — it holds heavy glass panels in position against daily use, water exposure, and thermal cycling — so quality matters more than it might seem.
For frameless enclosures, C.R. Laurence and HMI are the two hardware brands Colfax Glass installs most frequently. Both manufacture heavy-duty hinges and clamps specifically designed for frameless glass applications. The hardware is available in a range of finishes: brushed nickel, polished chrome, matte black, oil-rubbed bronze, and satin brass are the most commonly requested. Matching your shower hardware finish to the rest of the bathroom fixtures (faucet, towel bars, light fixtures) creates a cohesive look.
Hinge quality is the single most important hardware decision. A frameless glass door weighing 60 to 100 pounds swings on two hinges multiple times per day. Cheap hinges wear out, sag, and stop holding the door in alignment. Quality hinges from C.R. Laurence or equivalent brands are rated for the weight of the glass panel and engineered for wet environments. The cost difference between premium and budget hinges is typically $40 to $80 per pair — a small fraction of the overall enclosure cost that directly affects how long the installation performs.
Header bars and support bars run across the top of the enclosure or diagonally from the top of the glass to the wall. They are not always structurally necessary for smaller enclosures but become important for larger panels or configurations where the glass needs additional bracing against lateral movement.
Matte black hardware has been the most requested finish across Colfax Glass shower projects for the past two years, followed by brushed nickel and polished chrome. The finish you choose does not affect performance — pick what matches your bathroom fixtures and personal preference.
Glass Coatings: Are They Worth the Extra Cost?
Protective glass coatings are applied at the factory or after installation to create a hydrophobic surface that repels water and resists mineral buildup. The two most common options in the shower glass market are EnduroShield and Diamon-Fusion. ShowerGuard by Guardian Glass is a factory-applied coating that is baked into the glass during manufacturing rather than applied as a surface treatment after the fact.
What these coatings actually do is reduce the surface energy of the glass so that water beads up and rolls off rather than sheeting across the surface and leaving mineral deposits behind as it dries. In hard water areas — and most Sierra Foothills communities have moderately hard water — this makes a meaningful difference in daily cleaning effort. Without a coating, mineral deposits from hard water build up on unprotected glass within weeks of installation and become progressively harder to remove.
EnduroShield and Diamon-Fusion are aftermarket coatings that typically add $100 to $200 to the cost of an enclosure. They are effective and can be reapplied over time as they wear. ShowerGuard is a factory-applied option that costs more upfront but is a permanent part of the glass surface and does not need reapplication. The coating choice matters most if your home has hard water — if you are on a well system in the Foresthill or Grass Valley area, a glass coating is close to essential for manageable maintenance.
Even with a coating, glass enclosures are not maintenance-free. A quick squeegee after each shower and a weekly wipe with a mild cleaner keeps coated glass looking new with minimal effort. Without a coating, the same level of appearance requires significantly more scrubbing and the use of stronger cleaning products.
| Coating | Application Method | Typical Cost | Reapplication Needed | Best For |
|---|---|---|---|---|
| EnduroShield | Aftermarket surface treatment | $100 – $150 | Every 3 – 5 years depending on use | Most homeowners; good value for hard water areas |
| Diamon-Fusion | Aftermarket surface treatment | $120 – $200 | Every 5 – 8 years; more durable initial application | High-use showers; premium durability preference |
| ShowerGuard | Factory-baked into the glass during manufacturing | $200 – $400 premium over uncoated | Never — permanent part of the glass | Homeowners who want zero reapplication maintenance |
| No coating | N/A | No added cost | N/A | Budget projects or homes with naturally soft water |
What Does a Shower Glass Enclosure Cost in California?
Based on projects Colfax Glass has completed across the Sierra Foothills and coastal service area, here are the realistic cost ranges for a professionally measured, cut, and installed shower glass enclosure in California.
A standard frameless enclosure with a single hinged door and one fixed panel in 3/8-inch tempered glass, including hardware and installation, typically runs $1,200 to $2,500. The range depends on the size of the opening, the hardware finish, and whether a glass coating is included. Larger enclosures with multiple fixed panels, return panels, or 1/2-inch glass push toward $2,500 to $3,500 or more.
Semi-frameless enclosures run $800 to $2,000 installed for most configurations. Framed sliding bypass units for tub-showers, the most affordable glass enclosure option, typically land between $400 and $1,200 installed depending on the size and glass thickness.
What drives cost higher than the base ranges: custom shapes (neo-angle, notched panels around benches or half-walls), specialty glass (rain pattern, frosted, low-iron for extra clarity), premium hardware finishes, and glass coatings. What keeps cost reasonable: standard rectangular openings, 3/8-inch clear tempered glass, and common hardware finishes like brushed nickel or chrome.
Labor for a professional installation typically accounts for 30 to 40 percent of the total project cost. The installation itself takes 2 to 4 hours for a standard frameless enclosure. The longer part of the timeline is the measurement-to-installation lead time: custom glass orders typically require 2 to 4 weeks from the date of the final measurement to delivery.
Colfax Glass provides free in-home measurements for all shower enclosure projects. The measurement visit is where John assesses the wall conditions, confirms the opening dimensions, discusses glass thickness and hardware options, and gives you an exact written quote — not a range pulled from a website.
| Enclosure Type | Typical Cost (Installed) | Glass Thickness | Lead Time |
|---|---|---|---|
| Framed sliding bypass (tub-shower) | $400 – $1,200 | 1/4" | 1 – 2 weeks |
| Semi-frameless door + panel | $800 – $2,000 | 5/16" – 3/8" | 2 – 3 weeks |
| Frameless door + fixed panel (3/8") | $1,200 – $2,500 | 3/8" | 2 – 4 weeks |
| Frameless door + fixed panel (1/2") | $1,500 – $3,000 | 1/2" | 2 – 4 weeks |
| Frameless multi-panel / walk-in | $2,500 – $4,500+ | 3/8" – 1/2" | 3 – 5 weeks |
The Installation Process: What to Expect
A professional shower glass installation follows a precise sequence. Shower glass is custom-measured and cut — unlike windows, there are very few off-the-shelf sizes that fit properly. Getting the process right means getting accurate measurements before anything is ordered.
The process starts with an in-home measurement visit. John or a crew member measures the shower opening at multiple points — top, middle, and bottom of each wall surface where glass will contact — because walls are rarely perfectly plumb or level. Out-of-plumb walls are common in older foothill homes and even in newer construction. The measurement determines whether the glass needs to be cut with a taper or notch to achieve a clean fit.
Once measurements are confirmed, the glass and hardware are ordered. Standard configurations on clear tempered glass typically arrive in 2 to 4 weeks. Specialty glass (low-iron, frosted, or patterned) may add time. On installation day, the crew arrives with all glass panels pre-cut to the exact dimensions. Wall anchors and mounting hardware are installed first, then the fixed panels are set in position, leveled, and secured. The door panel is hung on its hinges and adjusted for proper swing, gap alignment, and self-closing action. Silicone seals are applied at all glass-to-wall and glass-to-curb joints.
The entire installation for a standard frameless enclosure takes 2 to 4 hours. Silicone needs 24 hours to fully cure before the shower can be used. The installer will leave the bathroom clean and walk through the door operation, cleaning recommendations, and warranty details with you before leaving.
- In-home measurement: precise measurement at multiple points on every glass contact surface, assessment of wall plumb and tile condition
- Product selection: glass thickness, hardware finish, coating option, and configuration are confirmed and quoted
- Order and fabrication: custom glass is ordered and cut to spec; typical lead time is 2 to 4 weeks
- Installation day: hardware mounted, fixed panels set, door hung and adjusted, silicone applied at all joints
- Cure time: 24 hours before the shower can be used; silicone needs to fully set
- Walkthrough: operation check, cleaning guidance, and warranty documentation provided
Special Considerations for Foothill and Coastal Homes
Sierra Foothills homes and coastal properties each present conditions that affect shower enclosure selection and installation.
In foothill communities like Colfax, Auburn, Grass Valley, and Foresthill, hard water is the most common issue. Well water in the higher-elevation communities is often quite mineral-heavy, and even municipal water in the foothill corridor carries more mineral content than Sacramento Valley water. Hard water leaves calcium and lime deposits on unprotected glass faster than soft water, which is why John recommends a glass coating for virtually every frameless installation in the foothills. Homes on well water should consider ShowerGuard or EnduroShield as close to mandatory rather than optional.
Older homes in Auburn's historic district and Nevada City frequently have bathrooms with out-of-square walls, sloped floors, and non-standard opening dimensions. These conditions do not rule out frameless enclosures but they do require more careful measurement and sometimes custom fabrication — tapered panels, notched glass around half-walls or benches, or angled cuts to match sloped ceilings. A semi-frameless option can be a practical alternative when wall conditions make frameless impractical without extensive prep work.
Coastal homes in Crescent City and Brookings face a different set of conditions. Salt air and marine humidity accelerate corrosion on exposed metal hardware. For coastal installations, Colfax Glass uses marine-grade stainless steel hardware or coated finishes rated for salt-air environments. Chrome finishes hold up better than matte black in salt air. Bathroom ventilation in coastal homes is also more important for glass enclosure longevity — constant high humidity without adequate exhaust puts stress on seals and hardware that inland homes do not experience to the same degree.
If your home is on well water in the Grass Valley, Foresthill, or Nevada City area, a protective glass coating is not optional — it is essential. Without it, mineral deposits can etch into uncoated glass within months and become permanent. The $100 to $200 for a coating saves hundreds in eventual glass replacement.
How to Choose a Shower Glass Installer
Shower glass installation requires precise measurement, careful handling of heavy tempered panels, and clean finishing work. The quality of the installation determines whether the enclosure looks right, seals properly, and operates smoothly for years. The California Building Code, Chapter 24 mandates that glazing in shower and bathtub enclosures meet specific safety performance standards, so proper installation by a qualified glazier is not just about aesthetics — it is a code compliance issue.
Verify that any installer you are considering holds a valid California Contractor State License Board (CSLB) license. Shower glass installation falls under the C-17 glazing specialty or B general building contractor license. Check any license number at cslb.ca.gov. Ask for a certificate of insurance and confirm it is current.
Get a written quote that specifies the glass thickness, hardware brand and finish, whether a coating is included, and the total installed price. A quote that says only 'frameless shower enclosure' without specifying the glass thickness and hardware is not a complete quote. Ask to see examples of completed work — any installer who does quality work will have photos of recent projects to share.
Ask how they handle out-of-plumb walls. A straight answer about measuring techniques and custom glass cutting for uneven walls tells you the installer understands real-world conditions rather than just catalog specs. Ask about their warranty: what does it cover, for how long, and what is the process if a hinge sags or a seal fails within the warranty period.
Colfax Glass provides free in-home measurements, written quotes with full specifications, and installation by experienced glaziers who work with shower glass every week. John stands behind every installation with a workmanship warranty and is available for service calls when something needs adjustment down the road.