A Chapter 7A window wall assembly is the complete exterior envelope surrounding a window opening — siding, sheathing, weather-resistive barrier, flashing, trim, and the window unit itself — engineered so that no single component creates an ember-intrusion or radiant-heat pathway during a wildfire exposure. Under the 2026 California Building Code, §707A.4 governs the wall side of that assembly, while §707A.3 governs the window. The two sections must be detailed together. A code-compliant window installed into a noncompliant wall is not a code-compliant assembly.
For Colfax homes in High or Very High Fire Hazard Severity Zones, the window-to-siding interface is where most ember intrusions originate. CAL FIRE post-fire incident reports from the 2017–2024 cycle repeatedly identify gaps at the head flashing, sill pan, and jamb trim as the entry point, even when the window itself survived intact. The glass holds; the assembly fails around it.
I'm John, owner of Colfax Glass. We have detailed and inspected hundreds of Chapter 7A wall assemblies across Placer and Nevada counties since the 2008 adoption, and the failure modes have not changed. This guide is the technical reference I wish every Colfax remodeler — homeowner, contractor, and architect alike — had in their hands before they spec a window project in a WUI zone.
Quick answer: A Chapter 7A wall assembly around a window in Colfax requires noncombustible or ignition-resistant siding (fiber cement, stucco, metal, or 7/8-inch nominal log/heavy timber), an ember-resistant weather-resistive barrier tested to ASTM E2912 or installed behind ignition-resistant sheathing, metal flashing at the head with proper drip edge, a sealed sill pan, and continuous integration with the window's nailing flange — all installed per a tested SFM 12-7A-1 wall assembly or by component compliance with §707A.4.1 through §707A.4.3. Get a free WUI assembly review.
Why the Wall Assembly Matters as Much as the Window
Most homeowners researching wildfire upgrades focus on the glass — and for good reason. Tempered dual-pane glass survives radiant heat that destroys single-pane. But IBHS post-fire investigations and the UC ANR Fire Network's 2023 component analysis consistently show that windows themselves are rarely the first failure. Embers entering through gaps in the wall assembly around the window — at the head flashing, the jamb trim, the sill, and behind cladding penetrations — start the structural fire from the inside out.
The NIST Technical Note 1796 study of structures destroyed in the 2007 Southern California fires found that 60 percent of fire entries occurred at building envelope penetrations, with window perimeter intrusions ranking among the top three pathways. The window held. The seal around the window did not.
Chapter 7A was written to address this. §707A.3 covers the window. §707A.4 covers the exterior wall. §707A.5 covers the deck. §707A.6 covers the roof. Each section has its own tested standards because each component faces a different exposure. For a window project to actually deliver wildfire protection, the §707A.4 wall side has to be detailed correctly — not just the §707A.3 window side.
This matters specifically for remodels. A new window in an old, noncompliant wall assembly creates exactly the failure pattern NIST documented: a survivable window framed by a vulnerable wall. The window project becomes the trigger to upgrade the surrounding assembly, because pulling the window out exposes the WRB, sheathing, and flashing for the only practical inspection window you will ever get. For a primer on the underlying glass requirements that drive §707A.3 compliance, see our tempered vs. laminated glass guide.
Pro Tip: When we quote a Chapter 7A window replacement in Colfax, we include a wall-assembly inspection at the rough-out stage. Twenty minutes with the window pulled tells us whether the WRB is intact, whether the existing flashing is adequate, and whether siding repair is needed. That same inspection costs a homeowner $400–$800 if done as a separate scope after the window is back in.
- 60 percent of structure fire entries in WUI events occur at envelope penetrations (NIST TN 1796)
- Window perimeter intrusions rank in the top three pathways alongside vents and roof edges
- §707A.3 governs the window unit; §707A.4 governs the wall around it — both must be compliant for the assembly to comply
- Remodels are the only practical opportunity to inspect and upgrade the WRB and flashing without full demolition
- An SFM 12-7A-2 tested window installed into a noncompliant wall is not a compliant assembly
Placer County WUI Map: Which Parcels Trigger §707A.4
Chapter 7A applies to new construction, additions, and major remodels on parcels classified as Moderate, High, or Very High Fire Hazard Severity Zone within the Wildland-Urban Interface. For Placer County, the relevant maps are the State Fire Marshal's 2024 FHSZ release for State Responsibility Areas and the 2025 Local Responsibility Area FHSZ adopted by the Board of Supervisors in June 2025.
The Colfax I-80 corridor is overwhelmingly High and Very High FHSZ. Parcels north of I-80 between Weimar and Magra trend Very High due to north-slope vegetation and limited road access. Parcels south of I-80 toward Iowa Hill Road trend High to Very High depending on canyon proximity. Auburn parcels east of Highway 49 are predominantly High FHSZ. Foresthill, Iowa Hill, and Alta are essentially uniform Very High.
Verify your specific parcel before you spec the assembly. Placer County maintains the interactive FHSZ viewer at engage.placer.ca.gov/fhsz which overlays the SRA and LRA designations on the parcel map. CAL FIRE's statewide FHSZ viewer is the authoritative source for SRA classification. Both maps are free and updated annually.
The major-remodel threshold matters. Under Placer County's adopted code, a remodel is classified as major when alterations affect more than 50 percent of the wall surface on any single elevation, when window or door rough openings are enlarged or relocated, or when sheathing or WRB is exposed across more than 50 percent of the wall area. Hit any of those triggers and the entire affected wall — not just the area you touched — must comply with §707A.4. This is the rule that catches Colfax remodelers off guard most often.
If your Colfax mailing address sits in unincorporated Placer County (which most do), the SRA + High/Very High FHSZ overlay almost always applies. Do not assume city-of-Colfax limits exempt you — they do not, because the LRA designation also triggers Chapter 7A in High and Very High zones. Pull the official parcel classification before you sign a contract. Our WUI window guide explains the FHSZ lookup process step by step.
| Project Scope | Chapter 7A §707A.4 Wall Trigger | Inspection Required | Common Colfax Examples |
|---|---|---|---|
| Single window like-for-like swap | No wall trigger — only §707A.3 window product | No (over-the-counter) | Replace one bedroom window, same size |
| Multiple windows, no opening changes | Triggered if total disturbed area exceeds 50% of one elevation | Plan check + rough/final inspection | Whole-side window replacement on a south elevation |
| New or enlarged window opening | Triggered for the affected wall area | Plan check + rough/final inspection | Adding an egress window, picture window expansion |
| Re-side or re-sheath an elevation | Triggered for entire elevation | Plan check + WRB inspection + final | Remove T1-11 and install fiber cement |
| Addition or new construction | Full §707A.4 compliance, all elevations | Full plan check + multi-stage inspection | ADU build, primary suite addition |
What §707A.4 Actually Requires for Exterior Walls
Section 707A.4 of the California Building Code (Title 24 Part 2, Chapter 7A) sets four distinct requirements for exterior wall assemblies in WUI zones. Each addresses a documented wildfire failure mode and each has a specific compliance path.
§707A.4.1 — Exterior wall covering. The siding must be one of: noncombustible material (stucco, fiber cement, metal, masonry, concrete), heavy timber (nominal 7/8 inch minimum), log wall construction (6 inch nominal minimum), ignition-resistant material as defined by §704A.2, or any wall assembly tested to SFM Standard 12-7A-1. This is the requirement that pushes most Colfax remodels toward fiber cement (Hardie, Allura, Nichiha) or stucco.
§707A.4.2 — Exterior glazing. This subsection back-references §707A.3 for windows and emphasizes that the glazing requirement applies to all openings in the wall, including window walls in great rooms and large fixed glass. Skylights are covered separately under §707A.5.
§707A.4.3 — Exterior doors. Doors must be either noncombustible, solid core wood with stiles and rails not less than 1-3/8 inch thick, or any assembly tested to SFM Standard 12-7A-1. This affects entry doors and sliding patio doors that share the wall plane with windows.
§707A.4.4 — Underfloor protection. For raised foundations, the underfloor area enclosure has its own requirements. While not directly part of the window-to-siding detail, it matters because underfloor venting is often visible just below first-floor windows on Colfax foothills lots with downhill exposure.
The missing piece, often overlooked, is the integration requirement implicit throughout the chapter: each component must be installed so that the assembly as built performs at least as well as the tested assembly. That implicit integration requirement is where window-to-siding detailing lives. The window passes its test. The siding passes its test. The flashing detail that ties them together is the project-specific work that has to happen on site.
- §707A.4.1 — Siding: noncombustible, heavy timber, log, ignition-resistant per §704A.2, or SFM 12-7A-1 tested
- §707A.4.2 — Glazing in walls: comply with §707A.3 (dual-pane, one tempered minimum, listed assembly)
- §707A.4.3 — Doors: noncombustible, 1-3/8 inch solid core, or SFM 12-7A-1 tested
- §707A.4.4 — Underfloor enclosure: separate requirements for crawl space and raised-foundation areas
- Implicit integration: as-built assembly must perform equivalent to tested assemblies — flashing detail is the on-site responsibility
| §707A.4 Subsection | Component | Compliance Paths | Tested Standard |
|---|---|---|---|
| §707A.4.1 | Exterior wall covering / siding | Noncombustible, heavy timber, 6" log, ignition-resistant per §704A.2, or tested | SFM Std. 12-7A-1 |
| §707A.4.2 | Exterior glazing in walls | Dual-pane with one tempered, listed assembly, or SFM-tested | SFM Std. 12-7A-2 |
| §707A.4.3 | Exterior doors | Noncombustible, 1-3/8" solid core, or tested assembly | SFM Std. 12-7A-1 |
| §706A | Roof covering | Class A roof assembly required in any FHSZ | ASTM E108 / UL 790 |
| §707A.6 | Vents | Ember- and flame-resistant vents | ASTM E2886 |
| Implicit | Weather-resistive barrier (WRB) | ASTM E2912 ember test or behind ignition-resistant sheathing | ASTM E2912 |
SFM 12-7A-1 vs. 12-7A-2: The Two Test Standards You Actually Need to Know
The State Fire Marshal publishes two adjacent test standards that govern Chapter 7A compliance for wall assemblies and window assemblies. They are not interchangeable. Understanding which standard governs which component prevents the wrong product being specified for the wrong location.
SFM Standard 12-7A-1 is the exterior wall covering and exterior wall assembly test. It exposes a 39-by-39-inch wall assembly to a 10-minute direct flame impingement plus a 30-minute radiant heat exposure. The assembly passes if no flame penetration occurs through to the back face, the back-face temperature does not exceed 250°F above ambient, and no glowing combustion or sustained flaming occurs on the back face. This is the test that fiber cement siding, stucco systems, and tested wood products pass to qualify under §707A.4.1.
SFM Standard 12-7A-2 is the exterior window assembly test. It exposes a complete window unit (frame, glass, hardware) to a 30-minute radiant heat exposure of 35 kW/m². The assembly passes if the glass remains in place, the frame does not develop a through-opening to the interior, and the assembly continues to provide separation between the exterior and interior environments. This is the test that Milgard Tuscany WUI, Andersen 100 Series WUI, Pella Impervia WUI, and Simonton StormBreaker Plus pass to qualify under §707A.3.
Two other standards round out the compliance picture. SFM Standard 12-7A-3 governs horizontal projections like decks and balconies. SFM Standard 12-7A-4 governs eaves and underfloor enclosures. Neither is directly the window-to-siding detail, but both connect to the wall assembly at intersections.
The critical detail for window-to-siding integration: neither 12-7A-1 nor 12-7A-2 specifically tests the joint between the two assemblies. The joint is the responsibility of the installer, governed by the implicit integration requirement and by the manufacturer's installation instructions for both the window and the siding. This is why detailing matters more than product selection alone.
Pro Tip: Ask your window supplier and siding supplier for the SFM listing PDF for each product, not just a brochure or a marketing claim. The State Fire Marshal maintains a public listing database where you can verify the test passage and the listing expiration date. Listings expire on a five-year cycle and products do get removed when they fail re-testing. We have caught two product specs in the last 18 months where the listing had expired and the manufacturer was still selling the SKU as WUI compliant.
ASTM E2912 and the Weather-Resistive Barrier Question
The weather-resistive barrier (WRB) — the layer of housewrap, felt, or fluid-applied membrane behind the siding — is one of the most overlooked components in a Chapter 7A wall assembly. Standard Tyvek HomeWrap, Typar, and 30-pound felt are not ember-resistant. They will char, perforate, and fail under sustained ember exposure, even when the siding above them holds. The result is an ember pathway directly into the wall cavity, where insulation and framing combust without ever igniting the visible exterior.
ASTM E2912 — Standard Test Method for Fire Resistance of Continuous Air Barrier Membranes — is the test used to qualify ember-resistant WRBs for WUI applications. It exposes the WRB to a controlled ember accumulation and measures whether the membrane maintains its integrity. WRBs that pass include VaproShield WrapShield SA, Henry Blueskin VP100 with the Henry FireShield assembly, and DuPont Tyvek Fluid Applied WB+ in conjunction with ignition-resistant sheathing. Standard housewrap does not pass.
The code does not name a specific WRB requirement in §707A.4 — this is the gap that catches inspectors and contractors. The integration is implicit. A wall assembly that has passed SFM 12-7A-1 has done so with a specific WRB in the tested configuration. Substituting a different WRB during construction can void that compliance even though the siding and framing are unchanged.
The practical workaround for Colfax remodels is to install ignition-resistant sheathing — typically 5/8-inch Type X gypsum or DensGlass exterior sheathing — between the WRB and the framing. This adds a tested fire barrier behind any WRB and effectively decouples the WRB choice from the assembly's compliance. The added material cost is roughly $1.50 to $2.50 per square foot of wall area, which on a typical Colfax remodel adds $400 to $900 to the elevation budget. It is the cleanest path to a defensible compliance position without specifying an exotic WRB.
Pro Tip: When a Colfax remodel exposes the WRB during a window project, photograph the membrane label before re-cladding. If the existing WRB is a non-rated product and the project triggers §707A.4 compliance for the elevation, you have a documented decision point: either upgrade to an E2912-rated WRB or add ignition-resistant sheathing. Either way, the compliance path is in writing, which matters for both the building inspector and your insurance file.
- Standard housewrap (Tyvek HomeWrap, Typar, 30# felt) is not ember-resistant and is not WUI-rated alone
- ASTM E2912 is the ember-resistance test for air barrier and WRB membranes
- Compliant WRB options include VaproShield WrapShield SA, Henry Blueskin VP100 + FireShield, DuPont Tyvek Fluid Applied WB+
- Alternate path: install 5/8" Type X gypsum or DensGlass exterior sheathing behind the WRB to provide a tested fire barrier
- WRB substitution mid-project can void a tested wall assembly's SFM 12-7A-1 compliance — match the listing or use the sheathing alternate
- Add cost of ignition-resistant sheathing in Colfax: roughly $400–$900 per typical elevation
The Window-to-Siding Flashing Detail That Actually Works
The flashing detail at the window perimeter is the highest-leverage installation choice in any Chapter 7A wall assembly. Done right, it provides a continuous ember-resistant transition from the window's nailing flange to the siding plane. Done wrong, it creates the gap that NIST identified as the dominant failure mode.
The code does not prescribe a specific flashing assembly. It prescribes the performance outcome — no ember intrusion through the assembly under wildfire exposure. The specifications below are the details we use on every Chapter 7A install in Colfax, derived from manufacturer installation instructions for fiber cement siding, fluid-applied flashing manufacturers, and the IBHS Wildfire Prepared Home program's WRB and flashing standards.
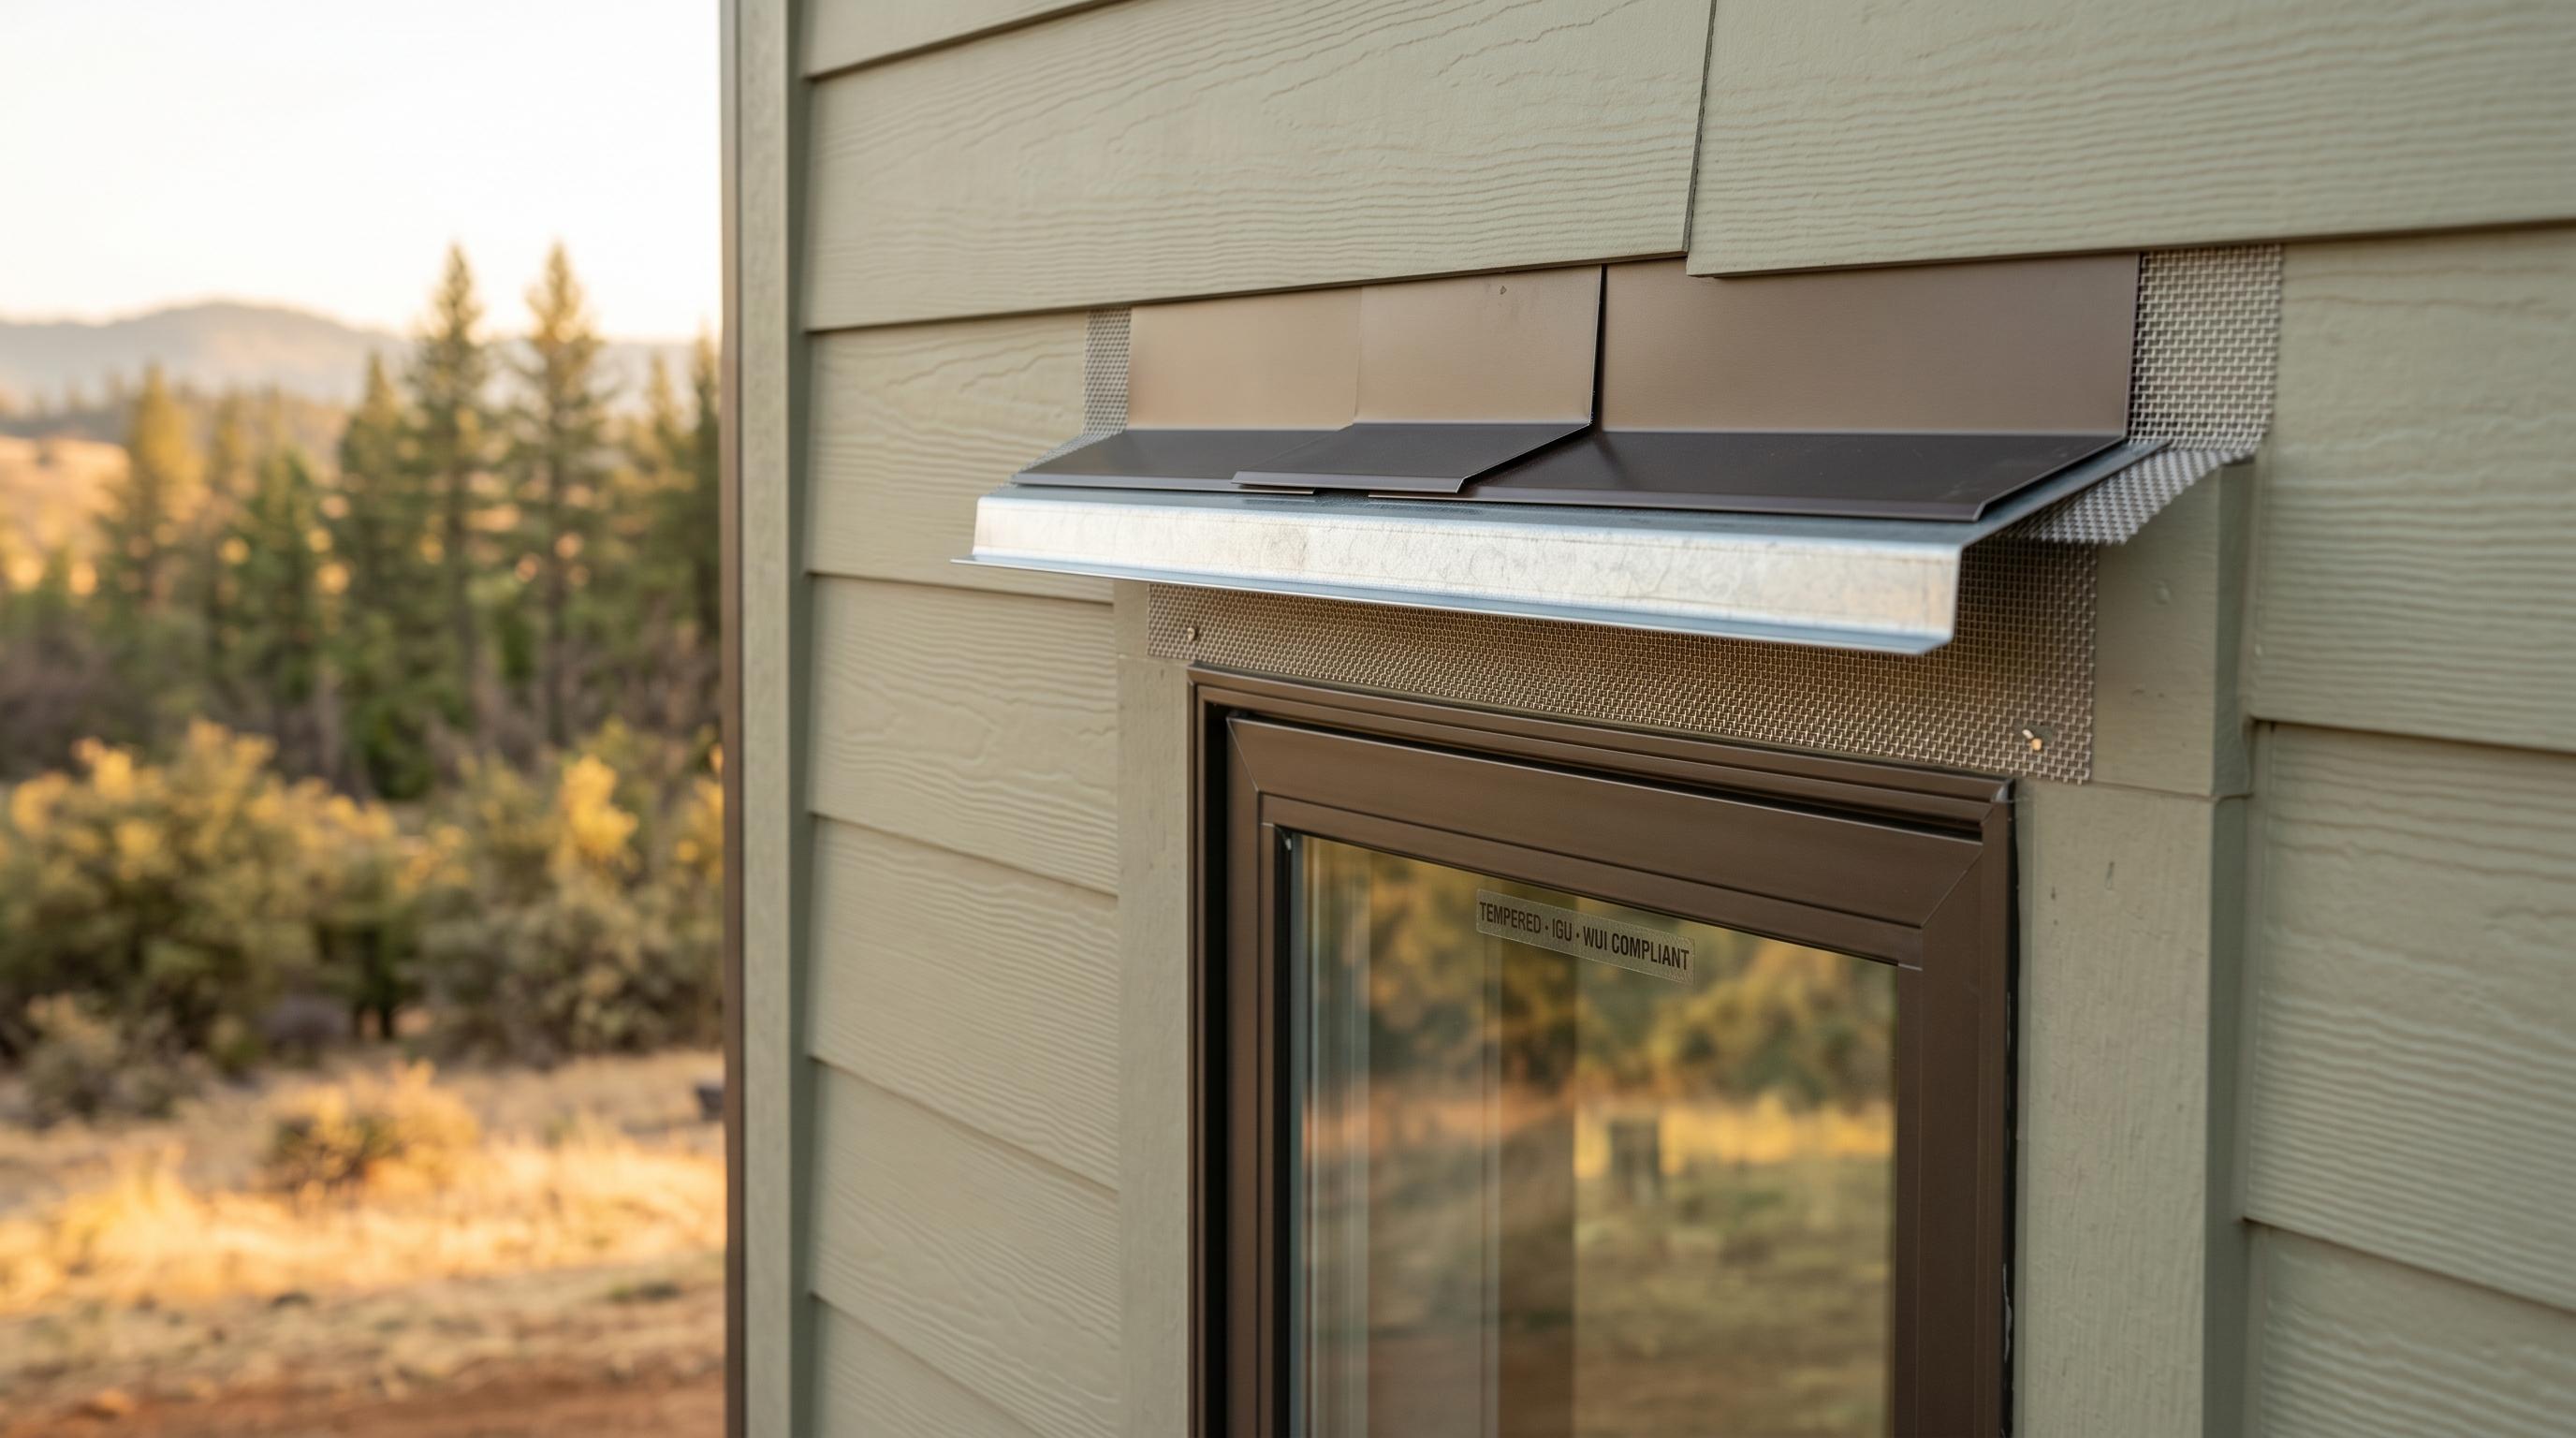
At the head: install a metal head flashing (galvanized 26 gauge minimum, or pre-finished aluminum) extending a minimum of 4 inches above the window opening, with end dams turned up at both jambs. The head flashing must extend out past the siding plane to form a positive drip edge — never trimmed flush. Behind the head flashing, lap the WRB shingle-style over the top of the flashing, and tape the WRB-to-flashing seam with an ember-resistant flashing tape such as Vycor enV-S or Fortifiber Moistop EZ-Seal.
At the jambs: install fluid-applied flashing or pre-formed flexible flashing (Vycor Plus or Tyvek Flex Wrap) lapping from the WRB face onto the window's nailing flange. The lap must extend a minimum of 4 inches onto each surface. Standard self-adhered window flashing tape rated for moisture is not automatically ember-resistant — verify the product carries either an ASTM E2912 listing or a manufacturer's WUI assembly listing.
At the sill: install a sloped sill pan — either pre-formed (such as the Jamsill Guard or SureSill) or site-built with fluid-applied flashing — with end dams at both jambs and a back dam at the inboard edge. The sill pan must drain to the exterior. This is the detail that fails most often in older Colfax homes: the original install used caulk as a sill pan, which has long since cracked and now allows both moisture and embers into the rough opening.
At the trim: maintain a continuous noncombustible or ignition-resistant material from the siding face to the window frame. Standard pine or fir window casing is not compliant under §707A.4.1 even when the field siding is. Use fiber cement trim (Hardie Trim, Allura), cellular PVC rated for WUI, or aluminum/composite trim. Caulk all trim-to-siding and trim-to-window joints with a noncombustible or fire-rated sealant — not standard acrylic latex.
The single highest-impact detail on a Chapter 7A window install is the sill pan. We have pulled out windows on 1980s and 1990s Colfax homes where the entire sill pan was a bead of failed caulk over bare framing. On a recent Iowa Hill remodel we documented active ember staining on the sub-sill from a 2021 fire that the home survived — meaning embers did enter the rough opening, and the home survived only because they did not find ignitable material. The sill pan is the cheapest, most overlooked detail in the entire assembly.
| Window Perimeter Location | Flashing Component | Material Spec | Common Failure Mode |
|---|---|---|---|
| Head | Metal cap flashing with end dams | 26-ga galvanized or pre-finished aluminum, 4" leg minimum | Trimmed flush — no drip edge, embers blow into seam |
| Head | WRB lap over flashing + ember-rated tape | Vycor enV-S, Fortifiber Moistop EZ-Seal, or equivalent | Reverse-lapped WRB allows ember entry behind flashing |
| Jambs | Self-adhered or fluid-applied flashing | Vycor Plus, Tyvek Flex Wrap, or fluid-applied — 4" lap minimum | Standard moisture flashing tape not ember-rated |
| Sill | Sloped sill pan with end + back dams | Jamsill Guard, SureSill, or site-built fluid-applied | Caulk-only sill — most common ember pathway in older homes |
| Exterior trim | Noncombustible or ignition-resistant casing | Fiber cement trim, WUI-rated cellular PVC, or aluminum | Combustible pine/fir trim adjacent to compliant siding |
| Trim joints | Noncombustible or fire-rated sealant | 3M Fire Barrier 1000NS, Tremco Fyre-Sil, or equivalent | Standard acrylic latex caulk degrades under heat exposure |
Ember Intrusion at Fenestration Penetrations: What Post-Fire Forensics Show
The phrase fenestration penetration covers any opening in the wall plane — windows, doors, skylights from the wall side, and the exhaust and vent terminations that often share the wall with windows. CAL FIRE damage inspection reports and IBHS post-fire investigations consistently identify these penetrations as the highest-frequency ember entry points in surviving and partially destroyed structures.
The IBHS analysis of 60 destroyed homes after the 2017 Tubbs Fire found that 84 percent of confirmed ember entries originated at penetrations rather than at intact wall surfaces. Of those penetration entries, the breakdown was approximately 38 percent at vents, 27 percent at window perimeters, 19 percent at door perimeters, and 16 percent at miscellaneous penetrations including dryer vents, hose bibs, and electrical box terminations on the wall plane.
The pattern is consistent with the 2018 Camp Fire data and the 2020 North Complex data: the wall holds, the openings fail. A Chapter 7A wall assembly that addresses §707A.4.1 siding compliance without addressing the penetration details ends up no safer than a pre-2008 wall assembly, because the dominant failure mode is unchanged.
For remodelers and homeowners, the practical implication is to budget the penetration work into the project. A single window replacement on a non-WUI house might cost $850 installed. The same window in a Chapter 7A retrofit with proper sill pan, jamb flashing, head flashing with ember-rated WRB integration, and noncombustible trim runs $1,200 to $1,650 installed. The 35–95 percent premium pays for the failure mode that actually destroys homes. The companion question of whether to do a retrofit or full-frame window replacement becomes especially important for Chapter 7A scopes — full-frame work exposes the entire perimeter for proper flashing detailing, while retrofit work cannot remediate a failed sill pan or compromised WRB.
- 84 percent of confirmed ember entries in IBHS Tubbs Fire analysis originated at envelope penetrations
- Penetration breakdown: 38% vents, 27% window perimeters, 19% door perimeters, 16% miscellaneous
- Pattern is consistent across Tubbs (2017), Camp (2018), and North Complex (2020)
- Compliant wall + non-compliant penetration detail = no improvement in survival probability
- Penetration premium on Chapter 7A retrofit: 35–95 percent above standard replacement cost
Compliant Siding Choices for Colfax Remodels
On the Colfax remodels we work, four siding categories cover essentially every Chapter 7A-compliant project. Each has a different cost profile, install difficulty, and aesthetic match for foothills architecture.
Fiber cement lap siding is the dominant choice for new construction and re-side projects. James Hardie HardiePlank, Allura plank, and Nichiha plank all carry SFM 12-7A-1 listings. Material cost in the Sacramento and Auburn lumber yards runs $2.40 to $3.80 per square foot. Installed cost on a Colfax remodel typically runs $11 to $16 per square foot including paint, trim, and disposal of removed siding. Color selection includes prefinished options that eliminate field painting.
Stucco systems remain common for ranch and Spanish-influenced foothills homes. Three-coat hard-coat stucco over metal lath, with paper-backed lath as the WRB component, is inherently noncombustible and meets §707A.4.1 by material category. EIFS (exterior insulation finish system) is more nuanced — only specific EIFS assemblies are SFM 12-7A-1 listed, so confirm the exact assembly with the manufacturer. Installed stucco runs $9 to $14 per square foot for a re-stucco; new construction stucco runs $7 to $11 per square foot.
Metal siding — including standing seam panels, board-and-batten metal, and corrugated profiles — is fully noncombustible and increasingly used on contemporary foothills homes. Galvalume and pre-finished steel siding from Bridger Steel, AEP Span, and McElroy Metal install at $14 to $22 per square foot finished. The aesthetic skews modern, which limits its appeal on traditional ranch remodels.
Ignition-resistant wood — including FRX-treated wood from Hoover Treated Wood Products and similar pressure-impregnated lumber — qualifies under §704A.2 and provides the wood aesthetic many foothills homeowners want. Cost runs $5 to $8 per square foot for the material, with installation similar to standard wood siding. The treatment is rated for limited exposure cycles, which means the product needs to be specified as exterior-grade ignition-resistant rather than standard FR-treated lumber, which is rated for interior applications only.
What does not qualify: standard cedar bevel siding, T1-11 plywood siding, untreated wood lap siding, vinyl siding (which can melt under radiant heat and is not §707A.4.1-compliant in any standard configuration). Many Colfax homes built between 1970 and 2008 carry T1-11 or cedar — both are non-compliant for any major remodel scope, and both are common upgrade triggers on window-replacement projects that exceed the 50 percent elevation threshold.
| Siding Type | §707A.4.1 Compliance Path | Installed Cost / sq ft | Best Fit for Colfax |
|---|---|---|---|
| Fiber cement lap | Noncombustible (Class A) + SFM 12-7A-1 tested | $11 – $16 | Most remodels and new builds; widest aesthetic range |
| Three-coat stucco | Noncombustible by material | $9 – $14 (re-stucco) | Ranch, Spanish, and stucco-original homes |
| Metal panel / standing seam | Noncombustible by material | $14 – $22 | Contemporary builds, ADUs, accent walls |
| Ignition-resistant treated wood (FRX-Ext) | Ignition-resistant per §704A.2 | $13 – $19 | Wood-aesthetic remodels in High FHSZ; verify exterior rating |
| Standard cedar / T1-11 / vinyl | Not compliant for §707A.4 trigger | n/a | Common existing condition — replace at remodel |
Permitting and Inspection: What Placer County Plan Check Looks For
Permit applications for Chapter 7A wall-and-window projects in Placer County go through plan check at either the Placer County Building Services office in Auburn (for unincorporated areas) or the City of Colfax Building Department (for in-city parcels). The plan check reviewer is looking for a specific package of documentation that, in our experience, catches most projects off guard the first time through.
The basic submittal requires a site plan with the FHSZ classification noted, elevation drawings showing the affected wall area, a window schedule listing each unit's manufacturer and model with the SFM listing reference, a siding specification with the SFM 12-7A-1 listing reference, and a flashing detail at minimum at the head, jamb, and sill. The flashing detail can be a manufacturer-published assembly drawing or a project-specific section drawing.
For projects that cross the 50 percent elevation threshold, the reviewer will also ask for the WRB specification and the documented compliance path — either an ASTM E2912 listing, an ignition-resistant sheathing layer, or an SFM 12-7A-1 wall assembly listing that includes the specified WRB. Submit this proactively to avoid a comment letter.
Inspection happens in two stages for most window-and-wall projects. The rough inspection occurs after the WRB and flashing are installed but before the siding is closed in. The inspector will physically check the head flashing, jamb flashing, and sill pan, and will ask to see the WRB tape detail at the window perimeter. The final inspection occurs after siding, trim, and finish work are complete and verifies the as-built matches the approved drawings.
Permit fees for window-and-wall remodels in Placer County typically run $250 to $700 depending on valuation, with most Colfax projects landing in the $350 to $500 range. Plan check turnaround is currently 3 to 6 weeks for routine projects. For new construction or ADU projects with full Chapter 7A scope, expect 6 to 10 weeks for plan check and a 60 to 90 day construction timeline once permits issue. Our Title 24 window compliance guide covers the energy-side requirements that run parallel to Chapter 7A on the same submittal.
Submit your flashing details with the original plan set — do not wait for a plan check comment. Placer County plan reviewers have flagged window-perimeter flashing as a routine first-cycle comment for the past three years. Including a manufacturer-published flashing detail (such as the James Hardie HardieWrap flashing detail or the Henry Blueskin VP100 window assembly drawing) clears the comment before it is written.
- Site plan with FHSZ classification noted
- Elevation drawings showing affected wall areas
- Window schedule with SFM 12-7A-2 listing references for each unit
- Siding specification with SFM 12-7A-1 listing reference
- Flashing detail drawings at head, jambs, and sill (manufacturer or project-specific)
- WRB specification with E2912 listing or ignition-resistant sheathing alternate (when 50% threshold triggered)
- Permit fees: $250–$700 depending on valuation
- Plan check turnaround: 3–6 weeks routine, 6–10 weeks for ADU/new construction
How Colfax Glass Handles Chapter 7A Wall-and-Window Projects
Our Chapter 7A remodel projects follow a five-step workflow that addresses code, integration, and documentation in one coordinated scope. This is what sets a wall-and-window project apart from a standard window replacement.
First, parcel verification and scope sizing. We pull the FHSZ and SRA/LRA classifications from the Placer County map for every quote, and we measure the affected wall area to determine whether the 50 percent threshold is triggered. This determines whether the project is a §707A.3 window-only scope or a full §707A.4 wall-assembly scope.
Second, integrated product specification. We spec the window unit and the surrounding wall components together — window line (typically Milgard Tuscany WUI, Pella Impervia WUI, or Andersen 100 Series WUI from our vetted Sierra Foothills brand list), siding match (typically Hardie or Allura for new install, or matched to existing for partial scope), WRB and flashing (Vycor enV-S head flashing tape, Vycor Plus or Tyvek Flex Wrap at jambs, SureSill or site-built sill pan), and noncombustible trim (Hardie Trim or matched fiber cement). The spec ships to the homeowner as a single document with SFM listing references for plan check.
Third, permit coordination. We submit plan check documents directly to Placer County Building Services or the City of Colfax, including pre-empted answers to the routine first-cycle comments. This typically clears plan check in one cycle and shaves 2 to 4 weeks off the timeline compared to a homeowner-led submittal.
Fourth, install with stage-gated inspection. We schedule the rough inspection with the inspector before we close in any siding. This protects both the homeowner and us — the WRB and flashing detail is documented before it is buried, and any inspector comments are addressed at the only stage where corrections are practical. We photograph every window perimeter at the rough stage as part of the documentation package.
Fifth, documentation handoff. Every Chapter 7A remodel ships with a binder containing the SFM listings for the windows and siding, the WRB and flashing product data sheets, the approved plan set, the rough and final inspection sign-offs, the photo set from each install stage, and a written installer certification of compliance. The package is formatted for direct submission to homeowners insurance carriers seeking Safer from Wildfires hardening discounts.
For a Chapter 7A wall-and-window remodel quote in Colfax, Auburn, Foresthill, Iowa Hill, Weimar, or anywhere along the I-80 foothills corridor, reach out for a free on-site assessment. We service the full Placer and Nevada County WUI corridor and typically schedule site visits within one week.
Common Questions About Chapter 7A Wall Assemblies in Colfax Remodels
These are the questions we hear most often from Colfax homeowners and contractors planning a Chapter 7A wall-and-window remodel. If your specific situation is not covered below, reach out — we provide free pre-design consultations for Colfax, Auburn, Grass Valley, and the surrounding foothills corridor.